Forum Posts
Wow - congrats! Perseverance pays off and this is where all the hard work will be worth it. Very much looking forward to seeing this.
Enjoy your time at the premiere!
Dan
Enjoy your time at the premiere!
Dan
Fantastic, Richard - best of luck with this! I've benefited a great deal from your training, learning a LOT about rendering in modo along the way - I highly recommend your training for anyone new to modo or anyone wanting a 'tune up' in their skills...
Dan
Dan
Oh, not a silly question at all. I do a lot of activities that put me in very tight spaces with my head and body closed in (cave diving, aviation stuff with pressure suits and oxygen masks) so I'm very used to it and never get claustrophobic with this kind of thing, but there's no doubt that a mask like this could make you feel a bit of discomfort. Visibility and ventilation is indeed restricted a bit - it can get a bit humid inside and fog over at times if you get really active in a warm and still environment with no breeze. The ear holes on this particular mask are open so it does help with a bit of induced airflow when you walk. Putting a tiny fan inside might actually help that a lot.
Funny, just this afternoon at Denver Comic Con I felt a tug at my pant legs and had to look down to find the tiny child asking if his Mom could take a picture of him with me - never saw him approach until he tugged at my leg! Cute as heck, but does illustrate the somewhat restricted field of view from inside at times... :-)
Dan
Thanks everyone! It was a lot of work, but a ton of fun putting this all together.
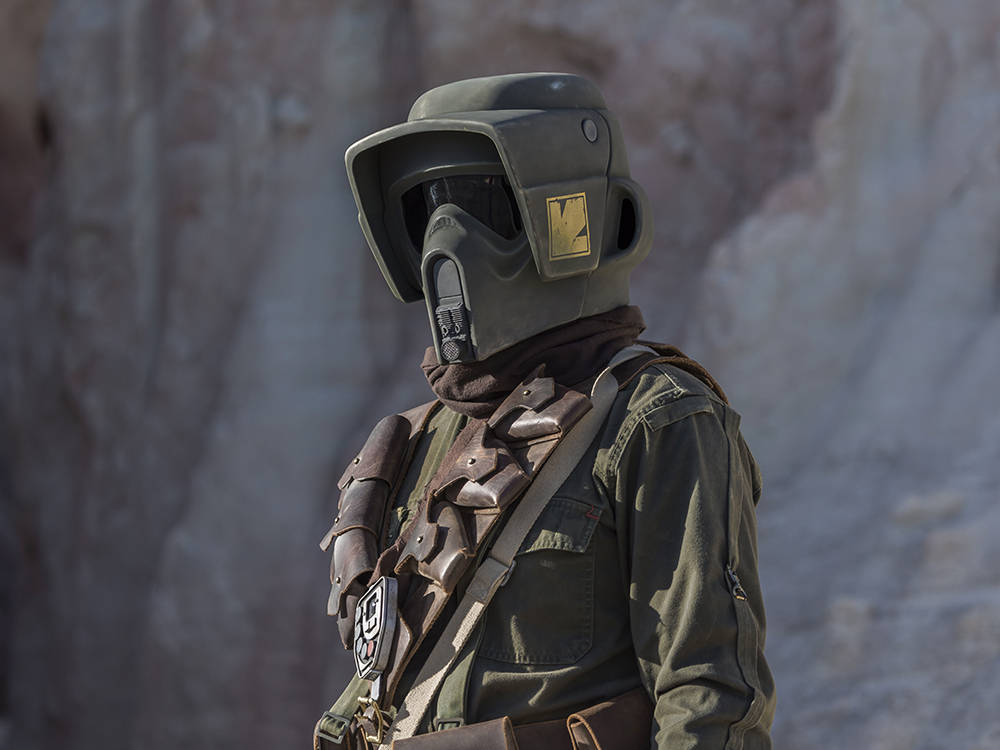
Sorry, I should have explicitly mentioned the helmet, as it is indeed one of the most prominent pieces of the whole costume. That is a kit I purchased from RS Props and assembled and painted myself. It's made from ABS and so is rather lightweight and easy to wear (but has to be handled with some care).
Weathering everything was a satisfying part of the process. Some that will still be ongoing for a while as this gets real-world exposure and wear-in. And indeed - I am the lucky wearer - that is me in the photos. Much fun - wearable art indeed... :-)
Dan
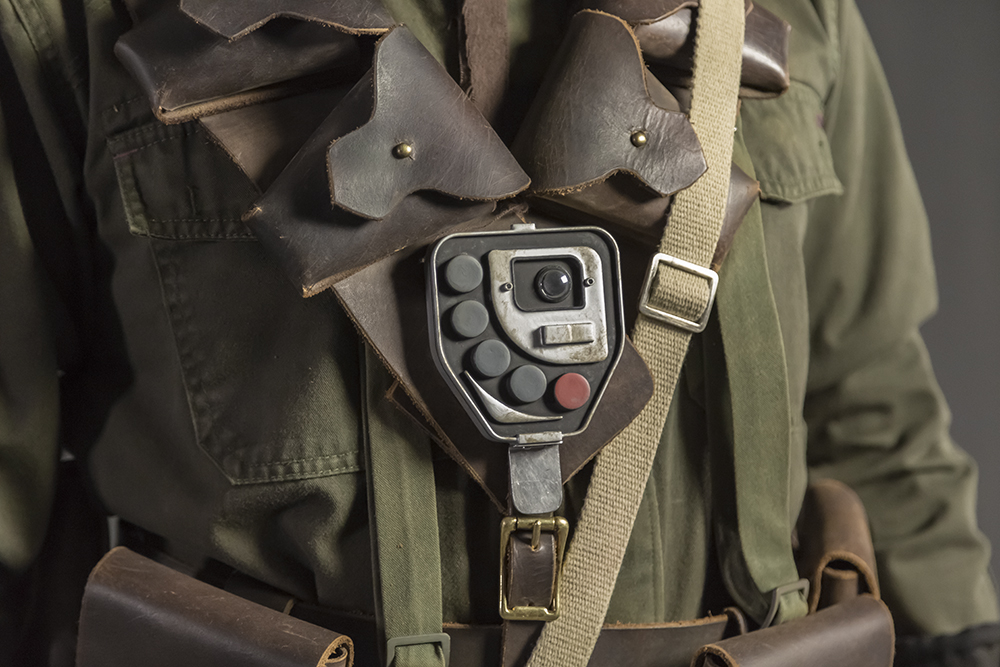
So, just an update on this project - the costume is finished finally! The blaster, the comms greeblie on the chest (with the red button), the caps for the 'smoke grenades', and the comms greeblie on the left glove were all modeled in modo and then 3D printed.

Dan
Dan
Awesome Brian! Still here and watching with interest. Fun to see that there's light at the end of the tunnel for you. Well, it's two small red lights, but you know... :-)
Looking forward to seeing it all done.
Dan
Looking forward to seeing it all done.
Dan
How many of you are using Affinity Photo vs Photoshop?
in GeneralFoundryFoundry & Industry DiscussionsClinging to CS6. I have purchased Affinity Photo to use on PCs other than my main machine while I am away on travel and I wouldn't mind seeing some demonstrations of good workflow there to give me a better 'tour' of the various features and capabilities than I have had the chance to survey on my own so far. But CS6 Photoshop is still my primary 'go to' app for editing my RAW photos and for my digital artwork. I concede that I will be forced to 'upgrade' to CC at some point, but it will be under protest and as a last resort...
Dan
Dan
Sorry for the tardy reply - I was away on travel all last week and was pretty much offline the whole time.
I'm not familiar with fusion 360, but the texture maps I made for the model here in modo come in three sets of seven maps each. Three sets to cover three longitude sectors around the spherical (well, actually oblate) model and seven different image maps for each for things like diffuse, bump, specular, luminosity (for the lights), etc. One or two of those are shown above in this thread. But the base color is captured in the material. I suppose I could try to figure out how to combine everything into a single cylindrical projection image map. Also, one might capture the image maps from the video mentioned in the third post above - that might work depending on what you are looking for...
Thanks for the nice comments!
Dan
I'm working on a costume build for a character from Rogue One. One of the accompanying props is a blaster similar to others used in the Star Wars universe but different enough that I couldn't buy an existing prop replica (for hard-core fans, it's a DH-17 variant). So I had to set about making my own from scratch based on reference imagery from the Blu-ray and the Rogue One Ultimate Visual Guide. After a bit of study and strategizing I decided that the best approach would be to build this thing as a combination of 3D-printed assemblies linked together by found items from the local hardware store. I did all the modeling in modo based primarily on the reference image seen in the top half of the first image here. I could set the absolute scale of things based on knowledge that this blaster model is based originally on a Sterling submachine gun.
The modeling in modo was a breeze (with a little back-and-forth with ZBrush for the hand grip). I shipped the 3D printing off to Shapeways. I had to scale the three printed subassemblies to fit with the found hardware parts. I had built everything to scale from the start in modo, so it was just a matter of making sure I set my scale correctly during the print process. Everything fit together perfectly and precisely.
It was a hugely satisfying process to start from scratch from reference photo to 3D model to a physical prop that I can hold in my hand and troop around with.
Dan
Oh, that's going to look nice! Fun to see things progressing along to this stage. Love it!
Dan
Dan
Thanks for the link to this - great read! When I was working on my Death Star project someone posted a link to the Star Wars Archaeology Panel at Star Wars Celebration Europe 2016 where John Knoll talks a bit about some of these details and shows some of the textures he built using modo's camera projection feature.
I just love all the attention to detail in all aspects of the Rogue One production. John Knoll is a genius!
Dan
I just love all the attention to detail in all aspects of the Rogue One production. John Knoll is a genius!
Dan
Thanks everyone! I really appreciate the kind comments on this. I had fully intended to have more done on this by now, primarily some additional animations especially with some of the really close-in detail on the Death Star, but I got sidetracked with the Rebel Cruiser hallway project for a bit. Until I can get back on to the animations here, here's another look at the final textured close-in version:
(Direct link to full-res version)
I had a ton of fun working out all that greeble texture. What you see here is only about 6 polygons - everything is diffuse, displacement, and spec texture built in Photoshop from some height maps that I exported out of modo after using the particle replicator to populate a bunch of Death Star surface greebles.
@virtual_francky - Proper credit where due, remember that 99% of the success of that Star Destroyer is due to the geometry built by Ansel Hsiao. I spent a little time playing with some minor geometry edits (mainly to bring it a bit more in line with the Star Wars/Rogue One version of the Star Destroyer versus the Empire Strikes Back version - it's still mostly the latter) and about a week adding all the lighting. The rest is all modo animation with a bit of After Effects for the engine light lens flares. Much fun doing those and I can't wait to get back to it to make a bunch more!
Dan
Quote from Jeegrobot :
"Newbie in animation" question!
Is it easy to move the camera in that realistic way?
Is it done by hand? Frame after frame? Or there is a trick to add randomness to the camera in an easy way?
Well, I do it the 'brute force' way by capturing a 3D camera solve from actual hand-held video with my DSLR. There are various camera tracking apps out there, but I use SynthEyes. It is indeed a pretty trivial process - the camera solves for most clips are very easy in SynthEyes (some 'tough' ones with fast pans or featureless patches of sky might require some special attention) and those camera solutions import into modo with a simple run of the exported SynthEyes script file from modo's 'System' tab. You'll get a new camera in the modo scene with every frame keyframed for the handheld video's XYZ camera position in the scene and the roll/pitch/yaw angles. In this case I chose to delete the XYZ keyframes and keep just the angle components. That still gives the impression of handheld video even while manually keyframing a very smooth camera path.
Now, others here better at this stuff than I am (I'm the newb here!) can tell you how you can do it all 'procedurally'/manually within modo without needing to use the 3D camera solve step. You can probably use some sort of expressions to put some random 'wiggle' on the camera path and angles. I'd be surprised if there wasn't already some nice little tutorial video out there somewhere - if not maybe one of the Pixel Fondue gurus can be coaxed into making one... :-)
Dan
I just had to! :-)
Still on a high from watching Rogue One, so I decided to add a guest to the corridor for a bit of context. Can't wait to get this animated, but it's going to have to wait until after the holidays...
Dan
After a bit of a hiatus for some 'day job' stuff (more impact experiments at NASA's Ames Vertical Gun Range) I've gotten a first quick test animation completed:
I compromised on render size and quality to keep the render time down (still a few days in 'walkthrough' mode), but it should give an idea of what the corridor might look like in 'game mode'. I used a hybrid approach to the camera motion - I used the angle data from a SynthEyes solve of some hand-held video from my 5D3 and simple XY position keyframing for the linear motion. Also, I never intended to fully detail the side rooms, especially the 'Vader choke' room off to the left in this animation, but I can see now that I'm going to want to add some of the detail in, so there go another few days... :-)
Dan
Quote from Dark_Moon :
How are you handling the lighting on that? I have tried some similar corridor scenes with lighting above through translucent panels like that, but can never get it to work out with the materials of the walls. Yours looks great!
Thanks! In this case I just left the 'lights' of the ceiling panels as empty space and lit the scene with the default 4-color environment with a white zenith (a one-color white environment would do it as well of course). That was simpler than using area lights - someone better at this than I am can tell us if direct lighting with actual lights up there would be better than using just the environment and pure global illumination. Now, I built this in 902, but if you've got modo 10.2 up and running you could use the really nice new mesh light option and turn your light panels polys into actual lights (rather than luminous polygons, which aren't as good at interior lighting - see Richard Yot's fantastic interior lighting tutorial). I've been thinking that I'm going to do that as an experiment to see how it looks and how render times compare...
Dan
Thanks everyone!
Yes, lots of Star Wars content here lately. I guess with Rogue One coming out soon some of us are getting into the mood. It's fun seeing all the great work from everyone. Maybe indeed we should all get together and pool our resources/talent and do a modo community Star Wars Trollbridge-like project...
I would love to adapt this to walk through in VR. Not sure what it would take, but I'd love to see it. Sort of anticipating that I decided to add a couple of stereo views just for fun. A nearly pure white environment with lots of red lights is probably the worst possible scenario for the standard red-cyan anaglyphs so I also made cross-eyed pairs if you can do that sort of thing. Enjoy!
Dan
Thanks James! And thanks again for the help a few days ago on the boolean thing - as you might have gathered now that was to get the hatch door finished up.
I've added a few more test renders, a bit larger with better quality to better show the work on the floor panels texturing.
Dan
I've added a few more test renders, a bit larger with better quality to better show the work on the floor panels texturing.
Dan
I've been working on this one for a few weeks - after spending so much time on the Death Star and Imperial hardware I figured the rebels needed a bit of equal time.
I've never done a 'scifi corridor' so I figured if I was going to start it might as well be this one as it is so iconic. The fun here, just as in my Death Star project, was the process of digging in to the details and trying to match as much as I could learn from looking frame-by-frame through the opening scenes. I then just started building geometry from scratch by eye. The three test renders here are set to roughly match the view in a couple shots in the movie. You can't see it here, but there are side corridor details behind the open doorways that is matched to what I could discern from watching the opening scenes about 43 thousand times over the last couple weeks.
If I were to do this one again I'd capture camera motion from the few dolly shots in the opening scenes and use the solved geometry to lay in the exact dimensions of everything. But I think/hope this will pass as 'good enough'.
I'm done with the geometry and will now move on to optimizing render time so I can get a few animations made to match some of the shots in the movie and to do a couple of 'walkthrough' tours...
Dan
Quote from MutantPixel :
so it's best to actually do a bevel operation on that giant polygon with no offset
Oh man - that worked perfectly. Thanks James!
Dan
I've run into an issue trying to bevel edges on a plane into which I've booleaned out some 'porkchop'-shaped insets.
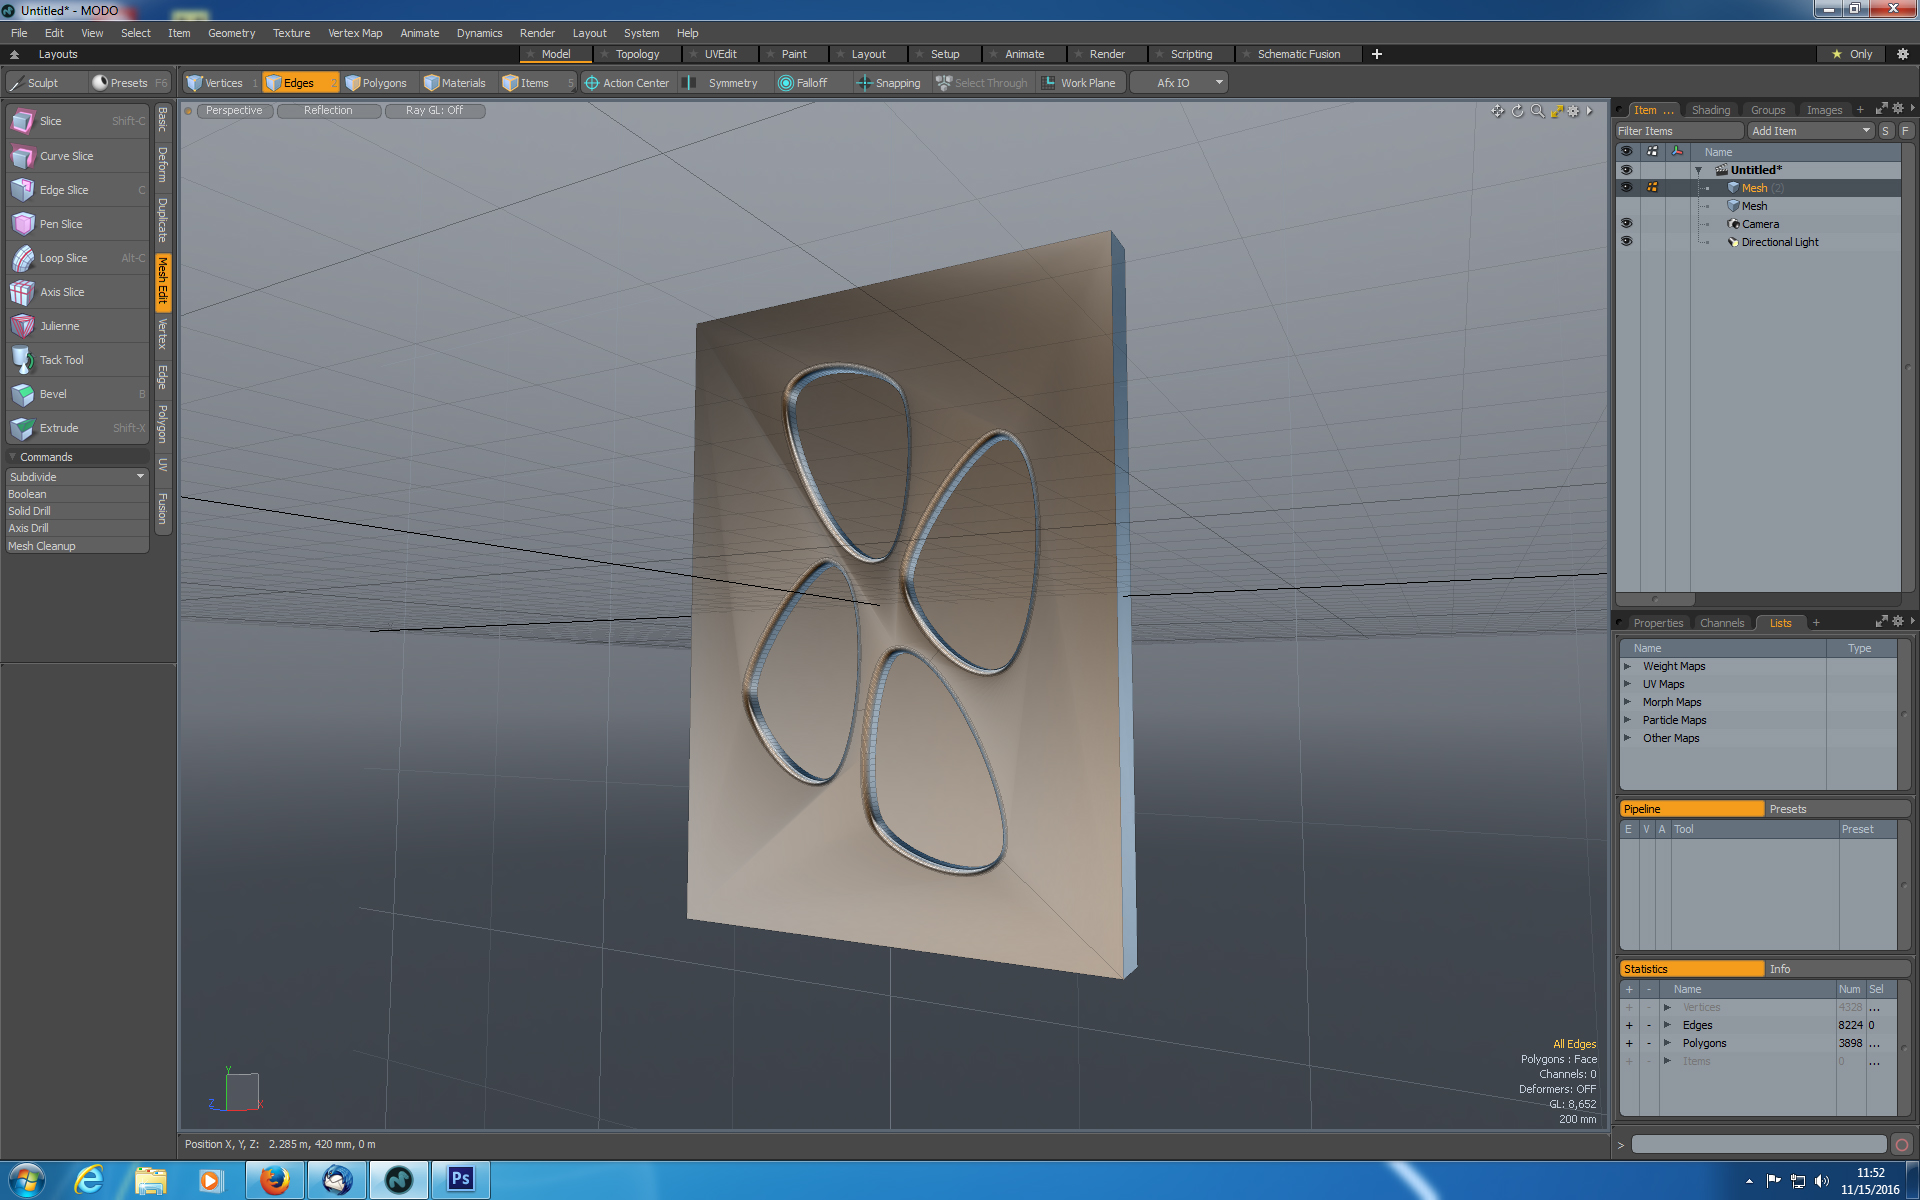
I want the edges of the inset areas to be beveled for a bit of smoothing so that I don't have knife edges. The initial face polygon right after the boolean subtract looks great, but as soon as I bevel the edges that face gets warped. It's the standard problem of warping the resulting face polygon because of the corner slices connecting its outer edges to the interior ngons after the boolean subtract. I suspect that if that face polygon were sliced up into a bunch of proper quads things might look smooth again, but with 108 sides to each of the 'porkchops' I don't know if I have the modeling fortitude to go in to do all the manual edge slicing needed.
Can someone suggest a non-Mesh Fusion solution to this problem that won't require hours of manual edge slicing?
Dan
Beautiful model! Really nice work!
Dan
Dan
Really nice work Eric, and VERY generous of you!
Dan
Dan
Thanks for the deeper look at the work on the robot. All that new mechanical detail - working, makes sense detail - really does it. Very nice work!
Indeed, that was way cool of them.
Keep charging on, it's all worth it. I know what those down times feel like - this last spring/summer for me was recovery from a horrible knee injury and reconstructive surgery, so I spent the time in modo (Death Star project and all) since I couldn't do my normal outdoor hiking life. But somehow it all works out in the end...
Dan
Quote from Paul B. :
kudos to James and Lukasz for helping you out
Indeed, that was way cool of them.
Keep charging on, it's all worth it. I know what those down times feel like - this last spring/summer for me was recovery from a horrible knee injury and reconstructive surgery, so I spent the time in modo (Death Star project and all) since I couldn't do my normal outdoor hiking life. But somehow it all works out in the end...
Dan
Dan